Friday, October 21, 2016

How do you do it with kids?

This is a question we get asked a lot.  I mean A LOT.

So ladies and gents, below are our top three secrets for how we make a reno work with little people:  

1. We have help.

LOTS OF HELP.  My parents, his parents, our siblings, our cousins, kids that I teach at school...seeing a trend here?  Basically, if someone offers help we take it.  If we can work for an hour without having to worry about our little ones, we will do it.

2.  We take the kids.

I grew up in renovations and honestly have no problems dragging my kids into them too.  Frankly, I think it is good for them.  They are learning how to work (yes, we make them work!) and we are building something amazing as a family with our bare hands.  It's pretty cool.


Our kids have learned how to remove wallpaper, break up tile, pull carpet staples, and paint (noticing a demo trend here?).  They have also hauled more trash than I could have ever imagined possible.  They'll work for a bit and then play for a bit.  Please, don't get me wrong, our kids have also whined, watched a lot of TV and played a lot of games while we work beside them.  But, we love being there together as a family.


3.  Sometimes we just don't go.


Yep, you read that right.  Sometimes our boys need their momma and/or daddy to stay home, hold them, play with them and just spend an evening with them.  Remember, we are doing this for our family, to help give us freedom to be together more.  So on those days when our kids need some extra love, we give it to them.  If we don't stop and cherish the moments now, when will we?


Monday, September 26, 2016

Wow!  Where does the time go?  I thought it has been 2, maybe 3 weeks since my last post.  But...yeah, try doubling that.  I would love to say that we were out of contact because we were so busy on the house, but frankly, we were busy with life.  You see, when we started this project we (Phil and I) determined that we wanted to tackle the project as soon as we could, but not at the sake of other things in our lives.  Our faith, our kids and our families are at the top of our priorities list.  And yes, we have an actual list.  Over the last few years, Phil has led our family beautifully into finding more balance in the crazy times (you can read more about his awesome ideas at philklutts.com and builtdadtough.com).  So we have intentionally pushed back and adjusted our deadline.  Life has thrown us some serious curve balls over the last few weeks and we have made adjustments as needed.

But, y'all...things are happening at the condo!  And I don't mean frustrating things.  Those days still come, but now we have more days where we leave and have made progress.  Real. Progress.  The drywall work is almost complete and then we will be ready to paint throughout.  Floors are being installed in the wet areas by our tile crew (me) and soon we will starting putting in cabinetry.  Big things are happening.  It's great!!!!

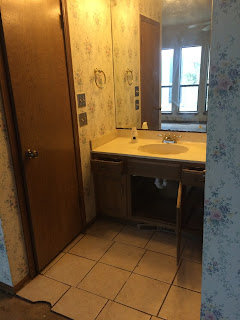
This weekend I completed the tile in the master bath.  Do you remember what it looked like when we started?
<shudder>

It neither looked nor smelled lovely.  We still need to install the vanity and finish painting the old door, but look at it now.  I hope you enjoy the sneak peak!

The new floors are installed, walls are painted and trim just needs to have a final coat of paint.

Come back soon to see the progress on the upstairs bedrooms and living room!

Saturday, August 6, 2016

Learning New Tricks

Apologies for our recent radio silence, summertime in our house is always a little crazy.  Add in the launch of Phil's project at work and the fact that I (as a teacher on summer break) have the attention span of a toddler who has consumed 20 pixie sticks...well, you get the idea.  Oh, and don't forget my two little mermen who can't be away from the swimming pool for more than 10 hours at a time.  Chaos. Beautiful glorious chaos.

Progress has been slower than we had originally planned and we have pushed back our "completion" date.  When we started the project, we knew that we would get contractors to do some of the work, and that we would do most ourselves.  Why?  We know how, and that my friends is how you build sweat equity.  By literally SWEATING.

One of the places that has thrown a definite kink in our timeline has been drywall.  There is a lot (and I do mean A LOT) of drywall work at our house.  We got a few quotes for someone to come do the work. OUCH!!!  They were pretty expensive and (because it is summer) we would be looking at a few weeks wait before they could get us on their schedule.  So, yeah, we are doing it ourselves.  We have done it before and to save a few THOUSAND dollars I will do it again.

While fixing holes with my dad I learned a new trick.  You know those holes that are caused by doorknobs, like the one below?


You can go to a home improvement store and buy a patch kit to fix these, but each kit will run you about $8.  Not a big deal if you only have one to patch. We have about 15-20 small holes like this around the condo.  That's over $100 to fix!!!  You can save time and money by using leftover materials you have on hand.


First, square up your hole with a box knife.  Grab a scrap of drywall and mark the edges of your hole and then cut the back paper on your patch.  Once you have scored the back, you can snap off the sides leaving the square in the middle.  During this step DO NOT remove the front paper.


Next, spread all-purpose joint compound around the hole and onto the back side of your patch.  After this, place the patch in the hole and use a putty knife to spread the joint compound.  Check for bubbles and wrinkles and be sure that your patch is as level with the wall as possible.  This is very similar to icing a cake, you want to make it smooth, but don't overwork it.


When you have completed the step above your patch should look similar to the one above.  This spot will need two or three more coats of joint compound and a good sanding to "float" the area and help it blend seamlessly with the rest of the wall.

Voila!  A free(ish) drywall patch.  Enjoy!  As a friend said recently, "You can learn to drywall in 10 minutes, but it takes 10 years to learn to do it well."  What are you waiting for?  Start practicing!!!


Tuesday, July 5, 2016

Go Get the Breaking Tools - aka DEMO

Demo.  It is a great and terrible part of any renovation.  At first, the smashing and breaking is fun and even therapeutic.  All too soon reality sets in and with it comes the blisters, sore hands and achy back. However, if you can demo your property yourself, it is a great place to save money and to make sure you see "the bones" of your property.

This past weekend we focused on demolition.  We had enough debris to justify getting a construction dumpster, and after researching a few companies we decided to use a local company (www.junk-boss.com).  It was a great choice!  They are fast, efficient, professional and very affordable.  The dumpster we chose was roughly the size of a pickup truck and was only 3.5 ft tall.  We have hauled a lot of junk in our day, and believe me...having them come and haul it off was worth every penny.
Junk Boss delivering our dumpster.  He parked that giant dumpster like it was a Honda. I was impressed!


I have mentioned before that this property is a mess, so there was a lot to demo.  We knew going in that there was water damage in a few areas and the troublesome cat smell that I have mentioned before.  Our main goal for the weekend was to take out all cabinets (cat smell begone) and to remove any water damaged areas to prep for replacement.  We also pitched toilets, ripped up old flooring, and removed wallpaper.  It was a long weekend, but a very productive one!

Two layers of vinyl were removed from the kitchen floor (left photo) and the front entry needed intensive work due to a poorly installed awning (right photo).

The condo still smells a little musty, but the cat smell is thankfully almost gone.  Our next task is to clean all the walls with a product known as TSP-90.  It is a professional grade cleaning product my family has used for years.  It will peel off layers of grime and stink to leave surfaces ready for paint.  Below you can see a wall that has been quickly cleaned using TSP and a sponge.  The change is plainly visible.
The result of a quick wipe-down with TSP.  Be sure to follow instructions and wear gloves when using this product.

We still have a few items left on our demo list, but we are very close to being ready to start putting things back together.  That my friends is very exciting!!!

Saturday, July 2, 2016

The Obligatory "Before" Post

I (Tara) have a soft spot for complete dumps.

Honestly. Long before reality TV made it the "in" thing to do, I have lived in, remodeled, and dreamed of restoring many a sad home to its former glory. Because the truth is that every home once started out beautiful.  Some of them have just lost their way.

This condo has definitely lost its way.  In fact it is the undisputed, reigning champion of The Ugliest House on the Block Competition (completed fabricated competition by the way).  This type of home is my favorite.

Many people walk into these homes and feel overwhelmed.  The smell of year old cat funk, the water damage, the holes punched in the walls by angry owners, the wallpaper (shudder...seriously, the most annoying thing on this list to me) are sometimes all that people can see (and smell).  Look beyond all that, imagine what it CAN be and go from there.
The laundry room..."lovingly" referred to as the cat toilet.  Oh the smell...gag!

Master Bath
You know you want that wall paper.  Come on over, you can take it.  I'll keep it from getting wrinkled by leaving it on the walls until you get here.

An interesting perk received when you pick the ugly duckling in the neighborhood is you get to meet LOTS of neighbors.  They all wonder who is the person crazy enough to tackle the insanity (us obviously) and at first they only share the horror stories of the the last person who lived there.  But the more you talk to them and the more you listen, the more you learn about the history of the HOME you are restoring to life.

Yesterday, I learned that this house was once the gathering place for all the neighbors.  They would sit on the covered porch out back (the only one on the street) and enjoy the evenings together.  The roses that are now raging out of control were once gorgeous.  We had already planned to transplant them to our home (its the wrong time of year to try and shape them at this property), but knowing how much they have been loved in the past makes me love them even more.

The overgrown roses.

All that to say, this old girl has a colorful past and is a mess right now.  But she has good bones and will be a wonderful home again soon.

Enough of my chatter, you really came to this post for the pictures.  I saved some of my favorites for the end.  Enjoy!!!  


The "candle shelves". This is only one wall.  All the walls have ridiculous amounts of smoke trails.


"Built-in shelving"...seriously, that's a direct quote from the real estate listing. I am going to go ahead and claim false advertising on that one.

"A great way to add value to any home is to convert your bathroom into a closet," 
said no real estate agent ever.

Yum.

The "cobblestone" effect in the upstairs hall.  
This rendered me speechless the first time I saw it (which is difficult).

Another listing feature is the kitchens double ovens.  If only they worked, or even closed.

And my favorite. The "creative" approach to plating this double switch.
Why have one when you can have TWO?


Friday, July 1, 2016

Embarking on New Adentures

Summertime, the time we seem to enjoy embarking on new adventures.

Nine years ago, we bought our first house together. It was just the two of us, a dog and an upcoming wedding.

3 years ago we broke ground on our "dream home".  Our clan had expanded to included two adventurous boys who joined in on the fun.

And just this week...well, we purchased our first investment property.


Let the new adventure begin.


Tuesday, January 21, 2014

The TUB!

Ok, some of you are probably exhausted by this topic, but I can't believe how in love I am with our master bath tub.  When making decisions for our home we wanted to make "classic" choices.  For us that meant finding items that had an old world feel and putting our own spin on it.  I think our tub is a perfect example of how we tried to accomplish our "dream."

Our tub was found in an abandoned shed that was destined become my aunt's chicken coop.  Here is what it looked like when we found it...


The color wasn't quite what we had in mind, so we decided to refinish it (please note sarcasm :)).  Our friends over at http://sixtwelvesixteenth.blogspot.com/ recommended a tub refinisher and he was great.   He not only does beautiful work, but knows enough about antique tubs to help us as we decided on final touches for the tub.  Is it possible to make it white inside and out?  Yes!  Just don't expect a perfectly smooth surface...its cast iron.  Should we try to find clawfeet? No, it is virtually impossible to find matching feet and then to find the exact ones to fit your tub is even more impossible.  The tub was made in a time where feet were made specifically for each tub.  What do we do about the old faucet holes?  Simply plug them.
We sent him the tub and he kept it for about a month, cleaning it and working on smoothing out the pockmarks and rust that weather and time had wrought.  While he worked on the tub itself, my dad made us a stand as a replacement for the feet.  At some point in the future we will add in a few more "in progress" pics, but until then...enjoy the final product!  I know that I do!